How to build a home automation device with ESPHome and Home assistant?
If you're just starting out with building your own IOT devices, you'll see a lot of mentions of the Arduino IDE and writing code. I've been through a fair amount of these myself. If you're trying to make a simple home automation device and you're not a big fan of coding, you'll be quickly put off. Writing code is complicated, even if you're an experienced programmer! What if there was a way you could specify which type of sensor you've got connected to your ESP8266/ESP32 and it just know how to read the data for you? What if you could get these sensors available to you in Home Assistant without writing a single line of code? That sounds pretty amazing right?
Luckily, this wonderful fantasy is actually reality! You can build entire smart devices, document the connected sensors, and build automations with your ESP devices and Home Assistant without writing a single line of code! It's time to make your life easier, without having to spend hours/days/weeks on learning how to code!
If you've written custom code for sensors in the past, you'll be delighted with the ease-of-use of ESPHome: You can register sensors and devices with simple YAML configuration files rather than writing code. In this guide, we're going to set up an ESP8266 device with ESPHome and create an interactive IOT device using a straightforward ESPHome configuration file.
These are the steps we're going to go over in this guide:
- Install the ESPHome add-on in Home Assistant
- Connect a sensor to your ESP8266/ESP32 device
- Create a basic ESPHome configuration file
- Flash your ESP device with your ESPHome configuration
- Add the ESPHome device to Home Assistant
- Add the ESPHome device sensor to your Home Assistant dashboard
As you can see, I'll assume you've got a running Home Assistant set-up and you already have a ESP8266 or ESP32 device. The 2 sensors we're going to use in this guide are a DHT temperature/humidity sensor and a relay. The temperature/humidity sensor will demonstrate how you can easily read values of your sensor with ESPHome and the relay will teach you how you can make your own home automation device interactive through Home Assistant.
These steps sound complicated, but I will include a lot of photos, screenshots, and code snippets so you can follow along without having to Google anything during the process.
Are you ready to get your hands dirty? I know I am! I'm excited to introduce you to ESPHome to make your home automation journey that much more pleasant! Let's get started!
Install the ESPHome add-on in Home Assistant
Before we can create Smart home devices with ESPHome, we'll need to install the ESPHome dashboard. There are other ways to prepare your devices for ESPHome, but the ESPHome dashboard is by far the easiest option. We want home automation to be simple and pleasant, so let's make sure it's as smooth and easy as possible for ourselves.
We'll use the ESPHome dashboard you can install in Home Assistant for a few simple reasons:
- Home Assistant owns the ESPHome project, so the integration is very stable
- You already have Home Assistant running on a Raspberry Pi or some other device, let's keep it simple
- Your Home Assistant will be/stay the centralized point of all of your home automation projects
For the sake of this guide, I'll assume you're going to stick with the guide and install ESPHome in Home Assistant. To install the Aadd-on in Home Assistant, we need to navigate to the add-on store:
Home assistant dashboard → Supervisor → Add-on store
Now search for ESPHome in the Add-on store:

Click the addon and on the next page you can install the add-on in your Home Assistant.

ESPHome is owned by Home Assistant, so you can be confident that the installation is well-tested and reliable. Updates won't break your installation. You can turn on the "Start on boot", "Watchdog", "Auto update", and "Show in sidebar" options. These options will make it much easier to quickly add new devices and manage existing devices. Ease-of-use is key!
You have just installed the ESPHome dashboard in your Home Assistant instance! Now we're ready to go to the next step: Giving your ESP8266/ESP32 something to do. Let's connect a sensor to it that we can add to Home Assistant later on in this guide.
Connect a sensor to your ESP8266/ESP32 device
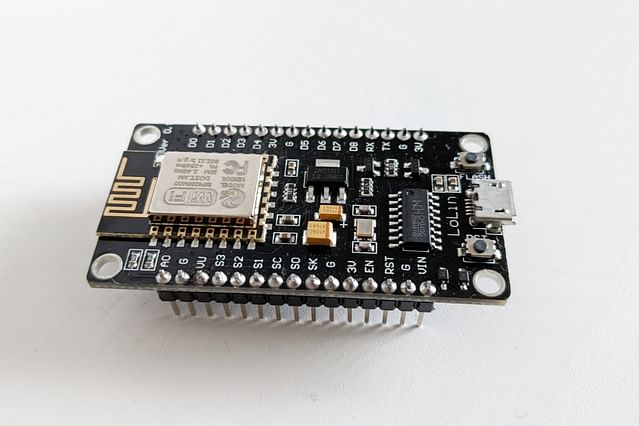
Let's connect our first sensors to our ESP device: A DHT sensor (temperature and humidity sensor) and a relay we can use for turning on larger devices like lamps. To guide you through this process, I'm using an ESP8266 to set up the sensors. If you're using an ESP32, your pin layout might be a little differently, so make sure to pay attention to these.
The ESP8266 has the names of the pins on one side of the board, while the actual pins are on the other side of the pins. This makes it a little tricky to put the sensors on the right GPIO pin at times, so I'd advise you to always double-check if you've got your sensors connected to the right GPIO pins.
This is the pin layout for the ESP8266:

The first sensor we're connecting to the ESP8266 is a DHT sensor. This is what that sensor looks like:

As you can see, the DHT sensor has 3 pins, so we're going to need 3 pins on the ESP8266:
- A ground connection: marked as GND on both the ESP8266 as the DHT sensor
- A power source: marked as 3v3 on the ESP8266, and as VCC on the DHT sensor
- A data connection: we'll use GPIO pin D5 as this is right next to a 3v3 and GND pin on the ESP8266
Let's connect the 2 together, so it looks a little like this:

Now we'll do the same for a relay. The relay, just like the DHT sensor, has 3 pins:
- A ground connection: Marked as GND or DC- depending on your relay
- A power source: marked as VCC or DC+ depending on your relay
- A data connection: Marked as IN on your relay
In this guide, we won't look at the other side of the relay, the side that has NO, COM, NC. These will only become useful once we connect a larger device to them, something we won't do in this guide. We'll still be able to check if our automated relay works, because it'll click when you turn it on and off.
Let's connect the Relay to a 3v3, GND, and GPIO pin D8.
Your ESP8266 (or ESP32) should now have 2 connected items:
- A DHT sensor with a data connection on D5
- A relay with a data connection on D8
Both of these items should also be connected to a 3v3 and a GND. We're now ready to create a basic ESPHome configuration for our ESP devices, the connected DHT sensor, and the relay. Let's get to it!
Create a basic ESPHome configuration file
Now that we've put together the hardware, we'll need to put together the software as well. Luckily, ESPHome makes this very easy and we won't have to write code. We will, however, have to edit a configuration file, but the ESPHome dashboard makes this simple as well.
After you've installed the ESPHome dashboard in Home Assistant, you've added the add-on to the sidebar. Navigate to the ESPHome dashboard.
You will be presented with a basic page with a large green button in the bottom right corner "+ NEW DEVICE". When you click this button and you're not running Home Assistant on HTTPS, Home Assistant tells you that you'll need to connect the ESP8266 to the computer that's running the ESPHome dashboard. This sounds a little confusing, but it means that you'll need to connect your ESP8266 to your Raspberry Pi (or other machine) that's running Home Assistant in your house. You can connect the two using a micro-USB cable.
Once you click "Continue", you'll be prompted to enter a name for your configuration. You can choose a recognizable name for your new smart device. I'll call mine temperature-light:

When you press continue, ESPHome asks you what type of device you want to create the configuration for. If you know the specific board you're using, you can select that under the "Pick specific board" option. In my case, I know I have a NodeMCU ESP8266 board, so that's what I'm selecting:

Now, all you have to do is press "next" and your first ESPHome configuration is created for you!

If you wanted to, you could install this configuration on the ESP device that you've connected to your Raspberry Pi or other machine. However, your smart device won't do anything if you install this current configuration. So let's press "Skip" for now and set up our Wi-Fi settings.
Secrets
Now that we're on the ESPHome page with our "temperature-light" configuration, we're going to look at one of the important features of ESPHome.
When you create your first home automation device with ESPHome, you'll most likely want to connect your device to your local Wi-Fi network. If you want to connect to your Wi-Fi network, you'll need 2 things: Wi-Fi network name and the password. You could add the password of your local network in the configuration, but that's not a good idea for 2 reasons:
- Your password is supposed to be a secret
- You'll be reusing this password for many configurations and what happens if you change your Wi-Fi password? You'll have to change every single configuration file by hand.
So let's put this Wi-Fi password in the secrets!
In the top-right corner of the ESPHome page, you'll see a "Secrets". When you press this, a popup will show with the title "secrets.yaml".
Let's add our Wi-Fi access point and Wi-Fi password in this file:
## Your Wi-Fi SSID and password
wifi_ssid: "MyWiFiAccessPointName"
wifi_password: "MyWiFiPassword"
After you've entered your details, you can press "Save" at the bottom of the popup.
Write the configuration
We've set up our Wi-Fi secrets, so now we can edit the configuration of our brand-new Home automation device.
Let's edit the configuration of our device by clicking "edit":

You'll now be greeted with the only "code" that's involved in this entire process. This is the configuration file for your ESPHome device.
You might already see the Wi-Fi secrets being applied in your configuration, but if not, you can set these now:
wifi:
  ssid: !secret wifi_ssid
  password: !secret wifi_password
Earlier, we've connected two "sensors" to our ESP device:
- A DHT sensor on GPIO pin D5
- A Relay on GPIO pin D8
For these devices to be manageable through ESPHome, we'll need to configure the sensors in this configuration file. This sounds complicated, but almost all of the work has already been done before by contributors to the ESPHome project. All we need to do is find the right configuration on esphome.io. Open esphome.org in a new tab and follow along. I'll show you exactly how well this website can help you.
On the website, you'll find a lot of configuration, which is overwhelming at first. You will learn to navigate this quite quickly.
Let's use the search bar in the left top corner to search for "DHT":

We'll be greeted with the search results for the right sensor:

Let's click the first link of this search result, so we're on the page for the DHT sensor: DHT sensor.
When you scroll down this page, you'll see an example of the configuration being used:

Let's copy/paste this configration into our ESPHome device. Let's change the pin to "D5", rename the temperature name to "Light temperature", and rename the humidity name to "Light Humidity". Let's keep the update_interval at 60s, so our device will check every 60 seconds for changes in temperature or humidity. If you want to check this less often, for example every 10 minutes, you can change this to 600s. This is the configuration we have in ESPHome for the sensor now:
sensor:
  - platform: dht
    pin: D5
    temperature:
      name: "Light temperature"
    humidity:
      name: "Light Humidity"
    update_interval: 60s
We've now configured our first home automation sensor!
Let's follow the same steps for the relay and have a look at the final configuration for our device:
esphome:
  name: temperature-light

esp8266:
  board: nodemcuv2

## Enable logging
logger:

## Enable Home Assistant API
api:

ota:
  password: "auto-generated-password-goes-here"

wifi:
  ssid: !secret wifi_ssid
  password: !secret wifi_password

  # Enable fallback hotspot (captive portal) in case wifi connection fails
  ap:
    ssid: "Temperature-Light"
    password: "auto-generated-ap-password-goes-here"

captive_portal:

switch:
  - platform: gpio
    pin:
      number: D8
      inverted: true
    name: "Relay"
    icon: "mdi:lightbulb-on-outline"
sensor:
  - platform: dht
    pin: D5
    temperature:
      name: "Light temperature"
    humidity:
      name: "Light Humidity"
    update_interval: 60s
Explanation configuration:
- esphome.name: The name of our ESPHome device
- esp8266.board: The board we've selected during the setup earlier
- ota.password: The "over-the-air" updates password. This allows for device updates without connecting it using a USB cable
- wifi.ap: When the home automation device fails to connect to your Wi-Fi network, it creates its own Wi-Fi network so you can connect to it and change settings.
- switch: The relay is a switch device, it can be turned on and off. It's on the GPIO platform, because we use the data connection on the relay to turn it on and off.
Now that we have the complete configuration file, we can finally flash it to the ESP device and use our first home automation device!
Flash your ESP device with your ESPHome configuration
We're going to flash the ESP device with the configuration we've created! The very first time we do this, we have to connect it to the computer on which you've installed ESPHome. In my case, this would be the Raspberry Pi that's running Home Assistant. We'll need to use a micro-USB cable for this.

Now that the device is connected to the computer running ESPHome, we can flash the device through the ESPHome interface. On the ESPHome page, we see three dots above each other on our configuration. Press these dots and select "Install".
A new popup will show up and asks you how you want to install your new device.

Select "Plug into the computer running ESPHome Dashboard". You'll now be able to select your device from the list of connected USB devices:

When you select the right USB device, ESPHome will start to install your new Home automation device:

This will take a while the first time, so get a cup of coffee or do something else for a little while. The next time you do this process, it will be much faster, but ESPHome is now being installed on your ESP device, so this is quite slow.
After a while, you get the message: "setup() finished successfully!". You device has now been installed and you can press "Stop" at the bottom of the popup.
You'll now notice that the device status has changed from "offline" to "online".
The hardware part of this process is now complete! All that's left to do is integrate your new home automation device in Home Assistant!
Add the ESPHome device to Home Assistant
The most difficult part of this process is now complete! You've configured and installed your first home automation device with ESPHome!
Let's add it to Home Assistant, so we can use the nice interface to interact with our new device. Let's navigate to:
Home assistant dashboard → Configuration → Integrations
On the integrations page, you'll already see that our new ESPHome device is discovered:

Let's configure this auto-discovered device by pressing "Configure". The popup will ask you if you want to add the new device to Home Assistant. All you have to do is press "submit". Home assistant will now connect to your home automation device and register the sensors.
After it has connected to your device and setup the sensors, you'll be asked in which area this device is. You can select the appropriate area and press "Finish".
You home automation device has now been added to Home Assistant, which means you can create virtual switches in your Home Assistant dashboard! Let's see how to do that now!
Add the ESPHome device sensor to your Home Assistant dashboard
Our home automation device has been added to Home Assistant, so now we can add the sensors and switches to our Home Assistant dashboard.
Navigate to the "Overview" page and go to "Edit dashboard". You can now choose to add a new card to your dashboard:

You can choose which one you'd like to add, but I suggest "Entities", so you can add all sensors of the new home automation device to the dashboard in 1 card.
Select the right entities for the card like below.

If you've used the same configuration as I've posted earlier, your entity names will be:
- sensor.light_temperature
- sensor.light_humidity
- switch.relay
Give your card a recognizable name and press "Save".

You'll now have added a representation of your new home automation device in Home Assistant. You'll notice that the relay has automatically recognized that it can be turned on and off, so it created a nice switch for you. You can test whether everything works as expected by clicking the switch on and off.
Conclusion
Congratulations! You've now added your very first home automation device to Home Assistant using ESPHome! You can use the sensor data to build automations, or just leave them as they are now on your dashboard!
I hope you found this guide useful and you're excited to build more home automation devices with ESPHome!
Posted on: Jun 11, 2022 Last updated at: Jun 11, 2022